I based this project very closely on Kal’s design at www.theelectricbrewery.com. If you do the same please try to use the links on his website to help support him. I decided to make some changes to the design. I will follow up after I start using the system if I think they add any value.
1. I added an extra temperature probe on the input of the mash tun. This will let me monitor both the temperature going in and coming out of the mash tun. Kal does not monitor this since he has found that his system and process makes the HLT temperature the same as the mash in temperature, there for it would be redundant. Hopefully this will be the same case for my system, but who does not want extra bling and it will help me know if anything is going wrong. Instead of using two SYL-2352 1/16 DIN PIDs I used cheaper and smaller SYL-1512A 1/32 DIN PIDs. These are for temperature display and alarm purposes only so I do not need the features of the larger PID. I also swapped the two position alarm switch with a three position so I can set an alarm for either PID.
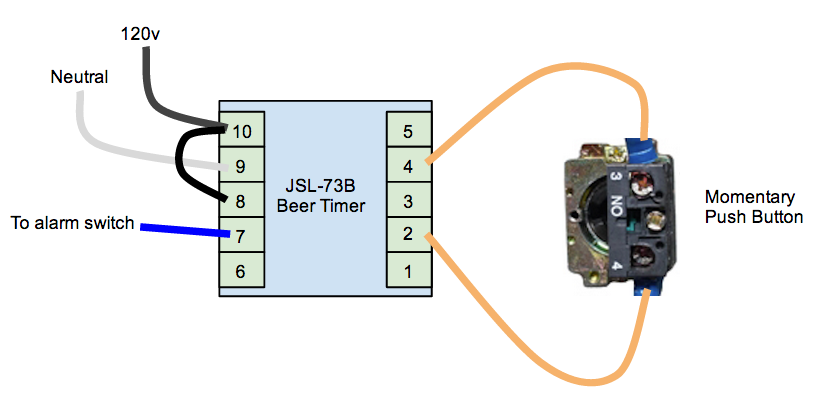
2. I used the Auber JSL-73B timer for for beer brewing vs the Omega timer. I think the ergonomics are better on the omega but I like the timer options on the auber better, plus it is cheaper. I hooked the red momentary button on the panel to the mute not the reset. The wiring is as follows. Pins: 10-8=120v power, 9=neutral, 7=alarm switch, 4-2=mute. The mute is simply a loop between 4 and 2 with the momentary switch in between. There is no need to supply power or neutral like the omega. I will add a post with a drawing.
3. Box orientation. My panel opens upward. This was originally done because was going to set the panel on a table are run the electric into the side of the panel. That plan changed but it does look more symmetrical and the cable plate is not an issue now.
4. Combined amp/volt meter. Picked up a cheap combo meter off ebay. It runs on 240v so there is no need for the doorbell transformers. This frees space inside and on the front of the panel and removes parts.
5. Added an emergency stop. It is simply wired before the power lead to the power switch.
6. Used a combined buzzer/light for the alarm.
7. I did install a safe start relay. I mistakenly purchased at relay with a 240v coil. The only change I needed to make was to swap the neutral lead with a lead to the other 120v leg. As a side effect the safe start relay now checks everything in the panel. Requires good 120v from leg A and leg B to power the coil on the relay. It checks the state of the pump and element switches and finally it requires a good neutral to activate the main power contactor.
8. The guys at chugger do not like you cutting the standard plug off their pumps so I used a standard two plug outlet for the pumps.
9. I used Chugger pumps vs March pumps. Chuggers were cheaper and it seems like they have worked out their earlier kinks.
10. I used less expensive kettles. They are 20 gallon stainless Concord stock pots (18″ wide x 19″ tall). At $99 each they are much cheaper then the Blichmann boil makers. The Blichmann’s are far nicer but I could not justify the cost. I used a false bottom from jaybird that is built like a tank.
11. Cam-locks vs quick-disconnects. I doubt these mater much. I like the cam-locks because they are more open so there is less chance of things getting gunk’ed up in places that are hard to get to.
12. I am using a whirlpool with immersion chiller vs a plate/counter flow chiller. I am also not using a hop stopper but plan to build a “hop dam” in the kettle that when combined with the whirlpool will keep trub away from the kettle pickup. I am also planing on upgrading my chiller to a The King Cobra by JaDeD brewing. This should match or even exceed the performance of most plate/counter flow options.