All posts by Daniel

False bottom and valves

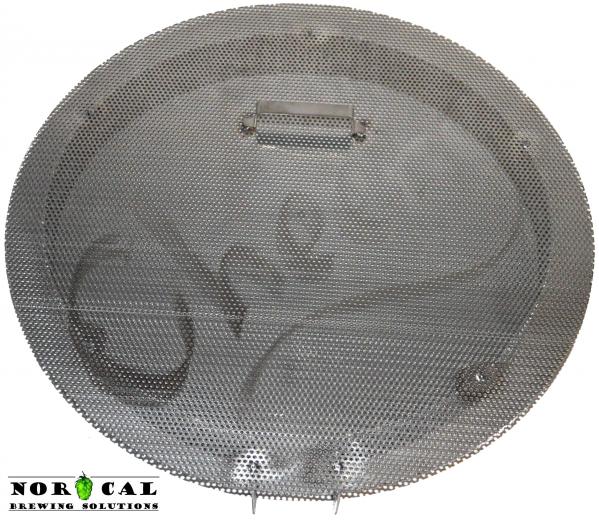
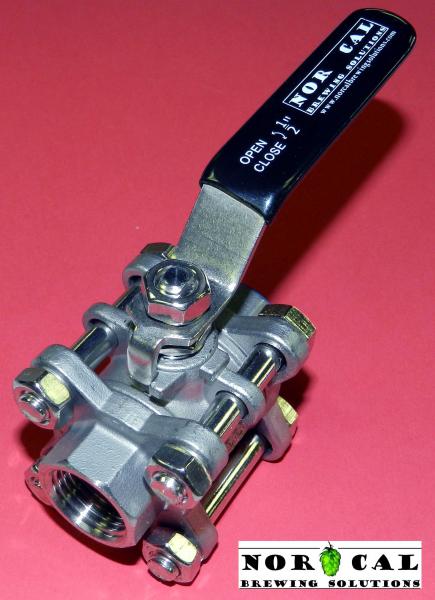
I ordered one of Jaybird’s (norcalbrewingsolutions) great false bottoms.  I will share pictures when it arrives.  He was also running a great sale so I  ordered the eight ball valves I will need.  I went with the three piece design.  Although I do not think they are necessary they allow for more flexible arraignment of the valve handle when using the 90 degree ELBarb bulkheads as dip tubes for the hot liquor tank and boil kettle.

20_Gallon_False_Bottom_Top_View 3-Pc_Ball_Valve

NorCalBrewingSolutions.com
1x 18″ 20 gallon Spike Brewing kettle false bottom with handle
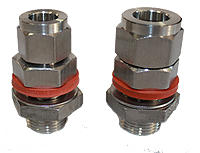
8x Three piece SS 1/2″ ball valve

First try at a lager

I am going to attempt my first lager.  It will be a Munich Helles.  I am using Wyeast 2308 “Munich Lager”.  I am doing my first step up starter.  I used the calculator on brewersfriend.  Using a manufacture date of 3/14 and two 1.5L steps I should end up with 458 million cells and a pitch rate of 1.74M cells / mL / °P for 5.5 gallons.   I am also going to try an interesting fast lager method from brulosophy.  If it works nicely it will make my lager and ale fermentation times nearly the same.  My tap water profile looks good for this beer, it would be nice if it was softer but I think I am close enough.

Target OG = 1.051
Target FG = 1.010
Target IBU = 20
Target ABV= 5.3%

95% German Pilsner (Best Malz)
3% Munich (Best Malz)
1% Biscut Malt
1% Melanoiden Malt
Hallertauer Mittelfrueh used for first wart hops to hit about 20 IBUs
Wyeast 2308 Munich lager yeast

Mash at 154 for 60 minutes
Boil for 90 minutes

Source

4/3/2014 – Starter Step 1 (1.5L & 150g DME)
4/5/2014 – Cool starter
4/6/2014 – Starter Step 2 (1.5L & 150g DME)
4/8/2014 – Cool starter
4/12/2014 – Brew day, fermentation chamber set at 50 degrees

Power!

Ordered the parts needed to build the power cables for the elements. Two L6-30 plugs some 10/3 wire and some cable and heat shrink wrap to make it look good.

l6-30plug

Amazon.com
2x NEMA L6-30P plug
1x 25′ Coleman 10/3 bulk wire
1x 4′ 3M 3/4″ heat shrink tubing
1x 25′ Flexo PET 1/2″ Braided Cable Sleeve, Black

Pumps and more

I have decided to go with center inlet SS Chugger pumps.  I also ordered the compression bulkheads to mount the HERMS coil and the return/whirlpool bulkheads.  I will also measure them for height to see if they will work for dip tubes.

chuggerpump hiflowelbow bulkcompressionbulk

Brewhardware.com
2x SS Center inlet Chugger pumps
3x 1/2″ High flow 90 degree bulkheads
2x 1/2″ Compression fitting bulkheads

Parts are arriving

My Auber order and my initial Amazon orders have arrived.  The US based ebay orders, the enclosure, and relays also arrived.  The China based orders are still in route.  I also placed another ebay order for a  10 foot L14-30 cord set for power.  I will be using a GFI breaker so I do not need a GFI cord set.

cord_set


ebay.com
1x 10′ L14-30 cord set

Element Solution

I ordered some element enclosures from Bobby over at www.brewhardware.com.  There are a lot of options to solve this problem.  A popular option is to build an enclosure out of a double gang junction box.  The price is right and I think Bobby’s solution is much better looking.

EWL3


brewhardware.com
2x Element enclosure EWL3 with large cord grip

Great Deal on Kettles

Just snagged some 20 gallon kettles for cheap.  $99 each and under $350 for the whole lot shipped to my door.  Prior to finding these I was looking at $250 and $350 options, and that was for one.  For the cost it is worth the gamble.  I am not big on fancy pots.  My current one is a 15 gallon Update International stock pot that I added a valve, sight glass, and thermometer to with weldless fittings.  The fittings have been great.  The pot is actually heavier then these new ones because it has a triclad bottom.  This is unnecessary especially for an electric kettle.  The new pots are 18″ wide by 19″ tall, I would have preferred a narrower and taller pot.  I will not be adding a sight glass or thermometer to these new pots.  I will have temperature probes on the new system and I find sight glasses to be more of a hassle then they are worth.  I prefer volume markings on my mash paddle.  A quick dip in the pot gives me the information I need with none of the additional mess and cleaning  that sight glasses bring.

kettle

Amazon.com
3x Concord 80 Quart Stainless Steel Stock Pot


First Order

I have decided to start with building the control panel first.  I view this as the most detailed and time consuming piece.  This order contains most of the components necessary for the panel plus the two heating elements and water filter.  Below is the basic panel layout and the contents of my first parts order.


panel_v2

Auberins.com
1x Flashing Buzzer 110v 22m
1x Emergency Stop Switch 22m
1x Push Button Switch Momentary 22m
LED Indicator 22mm
– 1x Blue 110v
– 2x Green 110v
– 2x Yellow 220v
2x SYL-3252 1/16 DIN PID Temperature Controller (SSR control output)
2x SYL-1512A 1/32 DIN PID Temperature Controller
1x JSL-73B Timer for beer brewing

Amazon.com
2x Leviton 2626F NEMA L6-30R Flanged Outlet Locking Receptacle
1x Leviton 2715 NEMA L14-30P Flanged Outlet Locking Receptacle
2x Amico 8 Position Double Row Screw Terminal Covered Barrier Strip 600V 25A
2x Amico Black Aluminum Heat Sink Heatsink 5.9″ x 3.5″ x 2.1″
2x Camco 02962/02963 5500W 240V Screw-In Lime Life Ripple Water Heater Element – Ultra Low Watt Density
1x Camco 40043 TastePURE Water Filter with Flexible Hose Protector
1x Sugatsune SWF 650 Stainless Steel Wire Pull Handle 5″ 2 pack
2x Sugatsune SWF 316 Stainless Steel Wire Pull Handle 12″
1x J-B Weld ColdWeld Compound – Epoxy Twin Pack

ebay.com
4x 3 pin Male Mini XLR Audio Microphone Chassis Mount
2x Solid State Relay SSR-40DA 40A /250V 3-32VDC
5x 22m NO 2 Positions Maintained Selector Switch
2x 22m 2NO 3 Positions Maintained Selector Switch
1x 22m 1NO 2Positions Maintained Key Selector Switch
1x AC Digital Ampmeter Voltmeter LCD Panel Amp Volt Meter
1x 16x16x8 NDOOR/OUTDOOR ENCLOSURE WITH/BACK.PLATE
3x 30A DPDT GENERAL P. POWER RELAY 120v AC COIL

First post and the start of my eHERMS build

This super cold winter has me motivated to build an eHERMS (electric heat exchange recalculating mash system) brewery.  I will be sharing the progress I make in the hope of helping others considering doing the same.

Many thanks to Kal over at www.theelectricbrewery.com for sharing his work.  Not only did he share his design he has documented it in great detail.  Try using the links on his site for purchases to help support his site.  He also sells a printed guide with even more detail.

The plan is a three vessel 20 gallon system.  Due to space constraints I will not be building a stand for the kettles.  It will be designed to temporarily fit my laundry room on brew day.  It will be similar to Kal design in many ways with some of my own tweaks.  I will be employing a 50′ 1/2″ HERMS coil, chugger pumps, Auber PID’s, 5500w ULWD heating elements and much more.

In the end I hope to have a high quality, easy to use, flexible brewery that I can comfortably use inside.